Leaking roofs and water damage haunt homeowners worldwide, causing thousands in repairs annually. Without proper flashing installation, even the most expensive roofing materials can fail, leading to structural damage and mold growth. Professional roof flashing installation creates a watertight barrier that protects your home for decades.
Installing roof flashing requires positioning 26-gauge metal pieces in stair-step patterns alongside shingle courses. Secure step flashing through horizontal sections with 2-inch overlaps, extend valley flashing 12 inches on each side, and use multi-layer protection for chimneys.
This guide explores essential techniques, materials, and best practices for installing durable roof flashing systems.
Key Takeaways
- Roof flashing creates waterproof seals at joints, valleys, chimneys, and wall intersections using galvanized steel, aluminum, or copper materials.
- Step flashing requires 2-inch overlaps with L-shaped pieces installed alongside shingles, secured only to the roof deck, not walls.
- Valley flashing needs 12-inch extensions on each side with 6-inch overlaps, installed along centerlines using corrosion-resistant fasteners.
- Install between 40°F and 100°F in dry conditions, avoiding rain and allowing a 48-hour weather window for proper adhesive bonding.
- Use minimum 26-gauge materials, avoid nailing vertical surfaces, maintain proper overlaps, and inspect substrate for damage before installation.
What is Roof Flashing and Why Is It Important?
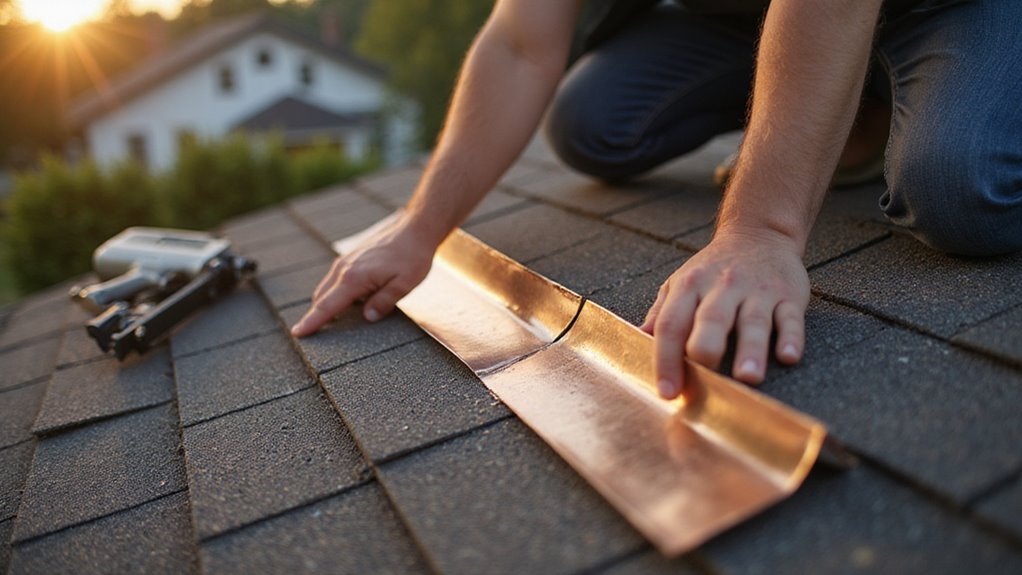
Roof flashing creates waterproof seals around vulnerable areas where different roof sections meet. These thin metal pieces protect your home from water damage at joints, edges, and penetration points.
Standard flashing materials include galvanized steel, aluminum, and copper with a minimum thickness of 26 gauge. Proper installation prevents leaks, structural problems, and dangerous mold growth.
According to building codes, flashing must be installed at valleys, ridges, chimneys, and wall intersections. Moreover, insurance data shows faulty flashing leads to most residential roof leaks. Professional installation safeguards your home investment against water damage.
What Types of Roof Flashing Are Available?
You’ll encounter five primary flashing types when protecting your Mississippi roof from water intrusion, each engineered for specific structural applications. Step flashing consists of individual 10″x7″ rectangles installed at wall intersections, while continuous flashing covers longer straight runs where vertical surfaces meet the roof plane. Valley flashing channels water at roof intersections, chimney flashing requires multi-piece cricket assemblies, vent pipe flashing uses rubber-boot penetrations, and drip edge prevents water from wicking under shingles at roof perimeters.
Step Flashing for Wall Intersections
L-shaped metal pieces protect where sloped roofs meet vertical walls. Each flashing piece measures 10″ x 7″ and requires galvanized steel or aluminum material. Water flows safely down the wall-roof intersection through overlapping metal sections.
The installation process demands 2-inch overlaps between pieces and secure attachment to the roof deck only. Nails must never penetrate the vertical wall surface. Metal pieces should bend at a 90-degree angle in the center for proper fit.
Furthermore, the flashing coordinates with each shingle course to maintain continuous protection. Corrosion-resistant metal (minimum 26-gauge steel) ensures long-lasting performance against weather elements.
Continuous Flashing for Straight Runs
Continuous flashing creates an unbroken waterproof barrier along straight wall-to-roof intersections. This single metal sheet protects where additions, dormers, or low-slope roofs meet vertical walls.
Key installation requirements include a minimum 26-gauge galvanized steel or aluminum material for durability. The flashing must extend 4 inches up walls and 4 inches onto roof decks. All sections need 6-inch overlaps with sealed seams.
Moreover, secure the top edge into mortar joints or behind siding to prevent water infiltration. Professional installation ensures long-lasting protection against moisture damage in these critical roof areas.
Valley Flashing for Roof Intersections
Valley flashing protects roof intersections from water damage. Proper installation requires either open or closed valley systems that meet IBC building codes.
Open valleys need corrosion-resistant metal like 26-gauge galvanized steel or aluminum flashing. The flashing must center over the valley with 12-inch extensions on each side. Secure only the edges to prevent leaks.
Furthermore, sections must overlap by 6 inches minimum with lap sealant for effective water protection. Professional installation helps avoid common leak issues. The ARMA Residential Manual outlines proven techniques for lasting protection.
Chimney and Vent Pipe Flashing Options
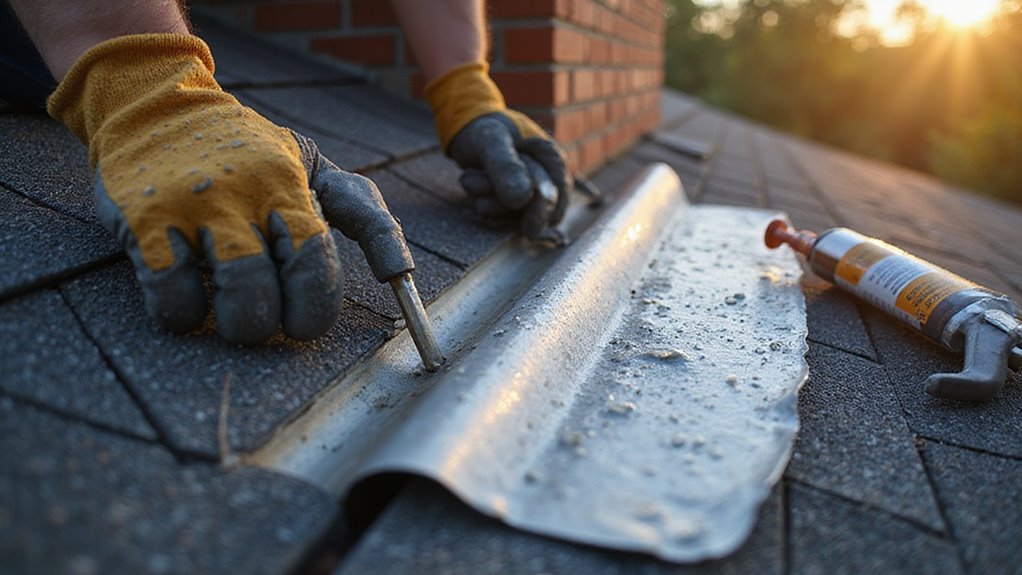
Proper flashing protects chimneys and vent pipes from water damage. Professional contractors install counter flashing into mortar joints with polyurethane caulk for a watertight seal. Base flashing needs a 3-inch overlap minimum, while aprons must extend 6 inches past the chimney base.
Chimneys wider than 30 inches require a cricket installation on the upslope side per building codes. A thorough masonry inspection helps identify potential issues before installation begins. Licensed contractors should handle any flashing projects valued over $10,000 to ensure code compliance. Furthermore, regular maintenance checks prevent costly water damage and extend flashing lifespan.
Drip Edge Flashing for Roof Edges
Drip edge flashing protects roof edges from water damage and prevents rotting. Install corrosion-resistant materials like galvanized steel (minimum 26-gauge) or aluminum along the roof perimeter. Secure the flashing with roofing nails spaced 8 to 12 inches apart.
The installation sequence matters for proper water management. Place drip edge at eaves before underlayment. Install rake edges after underlayment. Ensure 2-inch minimum overlap at all penetrations.
Proper installation safeguards homes against moisture issues in humid climates. The flashing directs water away from fascia boards and foundations.
What Tools and Materials Do You Need?
Before you begin flashing installation, you’ll need corrosion-resistant materials meeting Mississippi’s IBC requirements—typically 26-gauge galvanized steel or aluminum flashing, along with compatible fasteners and sealant. Your essential tools include tin snips, a hammer, measuring tape, chalk line, and a utility knife for cutting and fitting flashing precisely to roof penetrations and valleys. You’re also required to have OSHA-compliant fall protection equipment, including a safety harness and anchor points, for any roofing work above six feet.
Essential Flashing Materials
Essential flashing materials for roofing include metal sheets, sealants, and pre-cut components. Galvanized steel with 26-gauge thickness serves as the minimum requirement per IBC Chapter 15. Aluminum offers better protection against moisture and salt exposure.
The four critical flashing materials are:
• Step flashing: 10″×7″ metal rectangles for wall joints
• Valley flashing: W-shaped strips for water drainage
• Counter flashing: Two-piece units for chimney protection
• Sealants: Polyurethane or butyl caulk for joints
Additionally, proper installation requires matching fasteners and underlayment materials. Regular maintenance helps prevent water infiltration and extends roof life.
Required Tools for Installation
Aviation snips (left-cut, right-cut, straight) cut metal flashing to proper specifications. A roofing hammer removes old materials and drives nails effectively. A flat pry bar helps extract existing flashing safely.
Additional necessary items include chalk lines, measuring tape, and caulking guns. A tin bender creates precise angles in the flashing material. Moreover, OSHA requires fall protection equipment for work above six feet, including harness, lanyard, and roof anchor.
Safety Equipment for Roofing Work
Safe roofing requires specific protective gear to prevent injuries and accidents. A complete safety setup must include a full-body harness with OSHA-approved anchor points and shock-absorbing lanyard. Proper footwear means sturdy boots with non-slip rubber soles. Head protection comes from a well-fitted hard hat and impact-resistant safety glasses.
Moreover, every roofing site needs an accessible first aid kit for quick response to minor injuries. OSHA standards require safety equipment inspections before each use. These basic precautions help ensure worker safety at heights.
How to Prepare for Roof Flashing Installation?
Before you begin flashing installation, you’ll need to measure all penetrations, valleys, and wall-to-roof interfaces to calculate material quantities per IBC Chapter 15 requirements. Check Mississippi’s weather forecast to avoid working during rain or high winds, as proper adhesion and sealant curing require dry conditions. If replacing existing flashing, assess the substrate for rot or damage—particularly critical in Mississippi’s humid climate—and test for asbestos in pre-1980 structures before removal.
Measuring and Planning Your Project
Precise measurements and planning prevent costly mistakes in roof flashing projects. A standard tape measure and site assessment tools help gather accurate dimensions for all roof areas. Key measurements include valleys, ridges, and wall intersections. A detailed site plan maps out every penetration point requiring flashing.
Material calculations must follow building codes: step flashing needs 10″x7″ pieces with 2″ overlaps. Older buildings need special attention. Any structure built before 1980 requires asbestos testing first.
The Gulf Coast climate demands strong materials. Contractors must use 26-gauge galvanized steel or aluminum to resist high humidity. Regular inspections ensure proper installation and prevent water damage.
Weather Considerations for Installation
Check weather conditions before installing roof flashing to prevent failures. Most successful installations occur in temperatures between 40°F and 100°F. Never attempt installation during rain or on wet surfaces.
Monitor local forecasts for a minimum 48-hour window of ideal conditions. High humidity levels above 85% can affect adhesive bonding and increase corrosion risks. Spring and fall provide optimal installation seasons.
To ensure long-term protection, select moisture-resistant materials suited for your climate. Allow proper curing time according to manufacturer specifications before exposure to severe weather.
Removing Old Flashing (If Applicable)
Proper removal of old flashing prevents damage to your roof’s structure and waterproofing. Start with a thorough inspection to spot rust, holes, or loose sections. Houses built before 1980 require professional asbestos testing under Mississippi regulations.
Remove all nails and fasteners gently to protect surrounding shingles and underlayment. Take photos of damaged areas to guide repairs. Local waste guidelines require separate disposal of metal flashing from other roofing materials.
Additionally, check the surrounding roofing materials for water damage before installing new flashing. This step helps prevent future leaks and extends roof life.
Assessing Roof Condition
A thorough roof inspection identifies damage and confirms structural integrity before any flashing work begins. Look for rotting wood, sagging areas, and water stains on the decking and rafters. Check all joints, valleys, and edges where leaks commonly occur.
Your roof measurements should include 10×7 inch rectangles for step flashing and precise dimensions around chimneys. Building codes in IBC Chapter 15 outline specific flashing requirements for different roof types. The climate in your region affects material choices and installation methods.
Problems found during inspection must be fixed first to ensure proper flashing installation. Moreover, addressing structural issues early prevents future repairs and water damage.
How to Install Step Flashing?
Step flashing is installed in a systematic sequence alongside each shingle course where a vertical wall meets a sloped roof plane. You’ll position individual 10″x7″ flashing pieces in a stair-step pattern, integrating each piece with the corresponding shingle layer and securing it to the roof deck—not the wall surface. This method creates overlapping water channels that direct runoff away from the wall intersection, complying with IBC requirements for proper water penetration prevention.
Positioning the First Flashing Piece
Place the first step flashing piece on top of the last installed shingle. The bottom edge must align perfectly with the shingle’s butt edge. The flashing’s horizontal leg needs a 1-inch offset above the shingle’s exposure line.
A minimum 2-inch vertical leg must extend up the sidewall. Secure the flashing with a single roofing nail through the horizontal section only. The flashing material should be 26-gauge galvanized steel or better to meet building codes.
Furthermore, avoid puncturing the vertical wall leg during installation. This careful positioning creates a watertight seal between the roof and wall.
Integrating with Shingles
Proper flashing and shingle integration creates a watertight roof-to-wall connection. Each shingle must extend at least 3 inches over the horizontal flashing leg. Nails should pierce both materials together, staying 1 inch from bent corners.
Step flashing pieces overlap previous sections by 2 inches vertically to channel water down. The pattern alternates between shingles and flashing up the entire junction. This installation method complies with Mississippi IBC standards for roof flashing. As a result, water flows safely down and away from the wall connection.
Securing Flashing to the Wall
Proper flashing attachment requires specific methods to prevent water damage. Secure flashing only through the top horizontal edge into wall sheathing. Each piece must overlap by at least 2 inches to meet building codes. A waterproof underlayment behind the flashing creates an essential moisture barrier.
Stainless steel or hot-dipped galvanized nails provide maximum durability in humid climates. The fasteners should penetrate structural framing by 3/4 inch minimum. In wet regions like Mississippi, proper installation becomes even more critical for long-term protection.
Completing the Step Flashing Run
Step flashing pieces must create a continuous water barrier as you move up the roof. Each 10″x7″ metal piece overlaps by 2 inches minimum. Nail these pieces only into the roof deck to maintain integrity.
Mississippi building codes require corrosion-resistant materials for step flashing installation. Galvanized steel and aluminum work best in humid subtropical environments. Furthermore, proper installation prevents water intrusion and extends roof life.
Professional roofers secure each piece with roofing nails through pre-punched holes. Meanwhile, shingle courses interweave between flashing pieces for complete protection.
How to Install Valley Flashing?
Valley flashing protects one of your roof’s most vulnerable intersections where two slopes meet and channel concentrated water flow. You’ll need to prepare the valley substrate with underlayment, secure corrosion-resistant metal flashing (minimum 26-gauge galvanized steel per IBC standards), and integrate it properly with surrounding shingles using overlapping techniques. Mississippi’s high rainfall demands precise installation—improper valley flashing ranks among the leading causes of residential roof leaks in state insurance claims.
Preparing the Valley Area
Clean, dry valleys form the foundation for proper flashing installation. A well-prepared valley prevents water infiltration and extends roof life.
The roof deck requires careful inspection to locate rotted sheathing, which must be replaced immediately. Ice and water shield should extend 36 inches on each side of the valley centerline. Straight valley alignment prevents future water pooling issues.
Metal drip edge installation comes next. This critical step directs water away from the roof deck. Proper preparation now will prevent costly repairs later.
Securing the Valley Flashing
Valley flashing secures properly with corrosion-resistant roofing nails along established centerlines. Place nails 12 inches apart on each edge, keeping them 1 inch from the flashing perimeter. For Mississippi homes, use 26-gauge galvanized steel or aluminum flashing to resist humidity.
Proper installation prevents water damage and extends roof life. Overlap sections by 6 inches and seal with roofing cement before nailing. Gentle nail placement maintains waterproof integrity.
Moreover, regular inspections help identify corrosion or gaps early. Building codes require proper valley protection under IBC Chapter 15. Professional installation safeguards against leaks and water damage.
Overlapping and Waterproofing Techniques
Proper overlapping and waterproofing prevent water damage to roofs and buildings. A continuous sealant barrier must extend between each overlapped roofing section. The underlayment needs an 18-inch overlap from the valley center before adding flashing. Secure attachments at the top edges let materials adjust to temperature changes naturally.
Avoid placing fasteners in valley centers to maintain waterproof integrity. The valley serves as a critical drainage path. Smart installation techniques protect against leaks and extend roof life. Moreover, correct overlapping methods reduce maintenance costs over time.
Integrating with Surrounding Shingles
Proper shingle integration prevents leaks and damage around valley flashing. Start at the bottom and layer shingles upward over the valley flashing edges. Trim shingles at a 45-degree angle two inches from the valley centerline. Place nails six inches away from the valley center to avoid puncturing the flashing.
For best results, alternate shingle courses between both roof planes and maintain consistent overlaps. This technique creates a watertight seal that protects against moisture infiltration. The same methods work effectively for dormer flashing installations.
How to Install Chimney and Vent Flashing?
Chimney and vent flashing requires a multi-layer approach combining base flashing, step flashing, and counter flashing to create a code-compliant, watertight seal around roof penetrations. You’ll install corrosion-resistant base flashing first against the chimney face, integrate step flashing with each shingle course up the sidewalls, then secure counter flashing embedded into mortar joints to shed water over the lower layers. Proper sequencing and overlap dimensions are critical—Mississippi’s adoption of IBC standards mandates these installations prevent water penetration while accommodating thermal expansion.
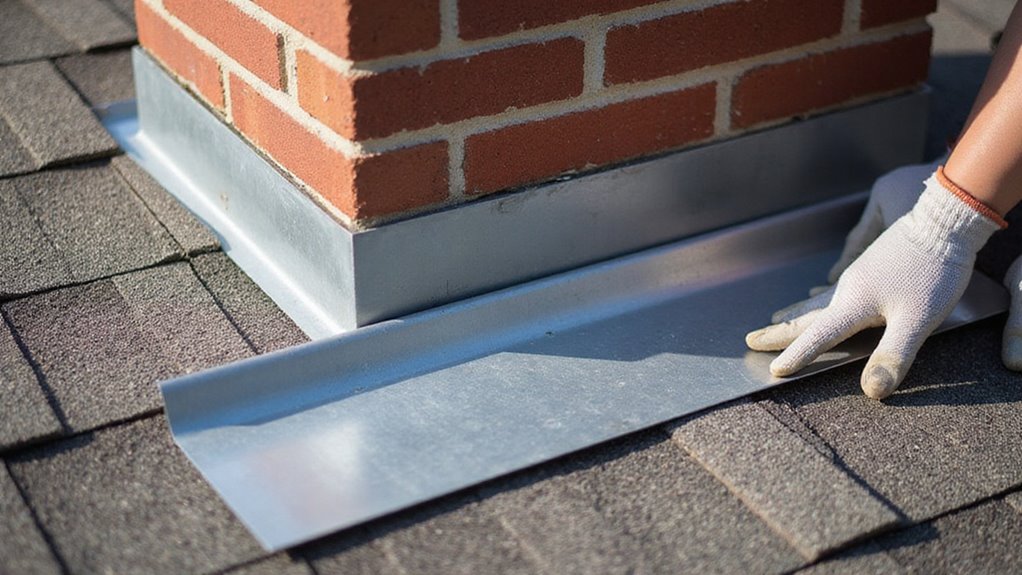
Base Flashing Installation
Base flashing must extend up vertical surfaces and underneath roofing materials to prevent water damage. A minimum of 26-gauge galvanized steel or aluminum provides essential protection against corrosion. Installation requires L-shaped metal pieces that create a waterproof barrier.
Base flashing should extend 8 inches onto the roof deck and 8 inches up vertical surfaces. Secure the lower edge under shingles with roofing cement. Each piece needs to overlap by at least 3 inches. As a critical rule, avoid puncturing the vertical section of the flashing. Finally, counter-flashing installation completes this protective system against water infiltration.
Step Flashing Around Chimneys
Step flashing protects the joint between a chimney and roof from water damage. Each flashing piece must measure 10″x7″ and bend at a 90-degree angle. Start at the bottom edge of the chimney and work up both sides. The horizontal part extends 4 inches onto the roof, while the vertical section rises 5 inches up the chimney.
Secure flashing only to the roof deck to allow for natural movement. Each piece overlaps the previous one by at least 2 inches. As a final requirement, Mississippi building codes mandate corrosion-resistant materials for all roof flashing.
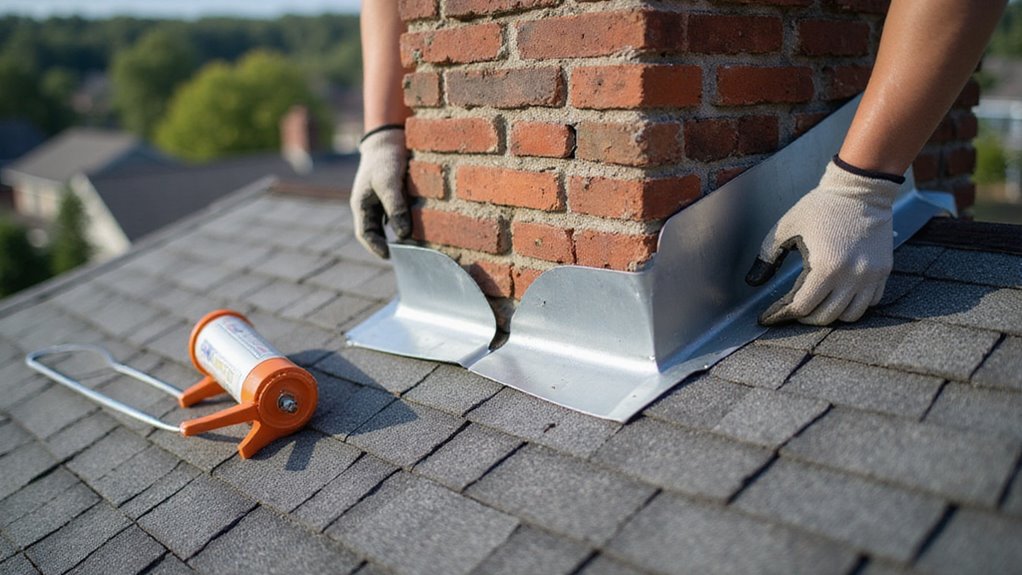
Installing Counter Flashing
Counter flashing seals and protects step flashing from water infiltration at roof-wall intersections. This critical roofing component prevents moisture damage in high-rainfall areas.
The installation process requires four precise steps. Cut reglets 1½ inches deep into masonry joints. Insert flashing pieces 4 inches into reglets with 3-inch overlaps. Fill reglets with polyurethane or mortar sealant.
For maximum protection, the counter flashing should cover step flashing by at least 2 inches downward. Regular inspection ensures lasting water resistance.
Sealing and Weatherproofing
Proper flashing installation around roof penetrations prevents water damage and structural issues. Base flashing must be installed first, with shingles overlapping the lower edge by at least 2 inches. Step flashing protects chimney sides through overlapped metal pieces. Counter flashing completes the system by covering exposed edges.
Building codes require corrosion-resistant materials like 26-gauge galvanized metal for all flashing components. Quality sealants, such as polyurethane or butyl, secure seams effectively. Moreover, professional installation ensures long-lasting protection against severe weather conditions. These weatherproofing methods safeguard homes from water infiltration year-round.
What Are Common Mistakes to Avoid?
Common mistakes in roof flashing installation can lead to severe water damage and expensive repairs. The most critical error occurs when installers nail flashing directly to walls instead of roof decking. Poor material choices create another major problem in humid climates.
Successful installation requires galvanized steel or aluminum materials of at least 26-gauge thickness. Moreover, proper overlap between pieces prevents water seepage. Furthermore, flashing sections must maintain a minimum 2-inch overlap for effective water protection.
Incorrect fastener placement also causes frequent failures. Building codes prohibit puncturing vertical flashing surfaces with nails or screws. This requirement helps maintain the waterproof barrier.
Need Professional Roof Flashing Installation? Contact BSL Roofing Today!
BSL Roofing offers professional roof flashing installation. Our certified experts prevent water damage and leaks through proper installation techniques.
Mississippi homes need protection from over 60 inches of annual rainfall through quality flashing installation. Our installers follow International Building Code Chapter 15 standards for all projects. Each installation uses premium materials that meet strict specifications.
Furthermore, BSL implements OSHA-approved safety protocols during every installation. Our state-licensed team uses 10″x7″ galvanized step flashing with 2-inch overlaps. A proper seal keeps your home dry and secure.
Most importantly, BSL guarantees leak-free performance for your peace of mind. Contact our team to schedule your compliant flashing installation today.